Tailwind's JIT Compiler Via CDN (Beta)
Before you Start
- Check Choosing a Build Method first to choose which option suits you best.
Introduction
A quick way to use Tailwind from within the Siteglide Admin
With special thanks to the folks at Beyond Code, we’ve adapted their open-source Tailwinds JIT compiler via CDN to optimise it for the Siteglide Admin and the SiteBuilder libraries. We've also added caching for better performance. Later in this article, we may abbreviate the name of this tool to "the JIT Compiler" or simply "JIT".
Quick Start
-
Switch to JIT Mode in SiteBuilder Tailwind Settings
Enter the Module Admin and Scroll past the libraries to the Tailwind Settings Card and click the gear icon.

Then select “JIT”.

-
Create a Page Template
Create a Page Template for your Library using SiteBuilder and add it to the Pages you're working on in the Siteglide Admin.
And that's it; you're ready to start work! When your Page is loaded in the browser a new inline
<style>tag will be created including all the Tailwind classes your page needs.Next, learn more about how the JIT compiler works by reading the rest of this article, including:
- Where to theme and configure your Tailwind Build
- Using caching to boost performance and how to update the cache when you make changes.
- How to handle classes which show conditionally e.g. on user-interaction or after JavaScript events.
How to Theme your JIT Tailwind CSS
The JIT Compiler uses a version of the Tailwind Config file that lies within <script> tags in the <head> of the page, inside the Page Template. This is because the JIT method runs in the browser and wouldn't be able to access the standard tailwind-config.js file on the root of a project.
You can edit the config file for the JIT method at the following default path in code editor: modules/module_86/layouts/tailwind/jit_tailwind_config_v4_0_0. This path can be changed in the Page Template by adding the optional_path_to_jit_config parameter to our Tailwind Liquid tag (using the platformOS format for partial paths)[https://documentation.platformos.com/developer-guide/pages/reusing-code-across-multiple-pages#step-2-include-the-partial]:
{% include 'modules/module_86/tailwind/head', optional_path_to_jit_config: 'tailwind/custom_config_file' %}
On page rendering, this will be inserted into a <script> tag in the Page Template. For older versions of SiteBuilder the config could be edited directly in the Page Template.
By default, we set up the Tailwind config file the way the library you’re using recommends in its documentation.
Since the JIT Tailwind Compiler uses Tailwind version 2.0, you can use most of the configuration options from that version of Tailwind. See here: Tailwind CSS Version 2.0 Documentation
However, there are some exceptions, for example plugins which work a little differently. See the BeyondCode team’s blog for details: Beyond Code Blog - Tailwind's JIT Compiler Via CDN
Getting Ready for Production - Performance and Caching
Wait! My web pages are loading really slowly!
There’s another setting in the Tailwind Settings menu in SiteBuilder called Cache CSS.
Just In Time Tailwind Compilation is designed to be convenient for Developers. A developer adds new code to their site containing new Tailwind classes and those classes are instantly added to the CSS on the page. However, this convenience would normally come at a cost: the work being done by the JavaScript would slow the page down.
In production however, there is no need to rebuild the CSS on every page reload, we only need to do this after an update has been made.
Turning caching on in your Tailwind Settings menu turns on caching for Tailwind CSS across the site. The CSS is saved (base64 encoded) in your pages’ metadata once generated and when the page is loaded, the server will generate a <style> tag based on that at the top of the document.
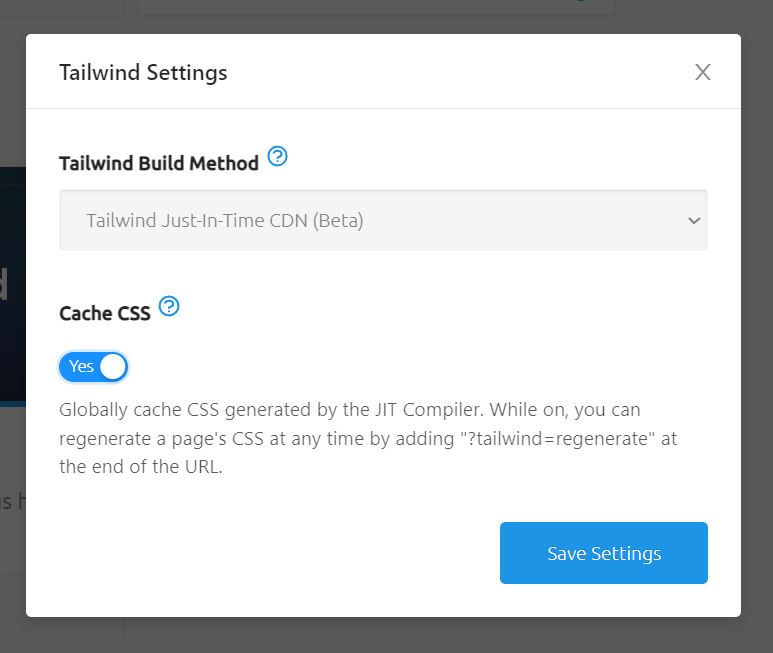
With caching on, the page will load lightning fast. Furthermore, since we optimise the CSS for that page only, it only needs to contain the clases on that page, rather than the entire site, so could even have speed advantages against an ordinary CLI Tailwind build.
Making Changes After Turning On Caching
If you add new Tailwind classes to a page, you can regenerate that page’s Tailwind by adding the query parameter ?tailwind=regenerate at the end of the URL. (see URL Search Parameters for details).
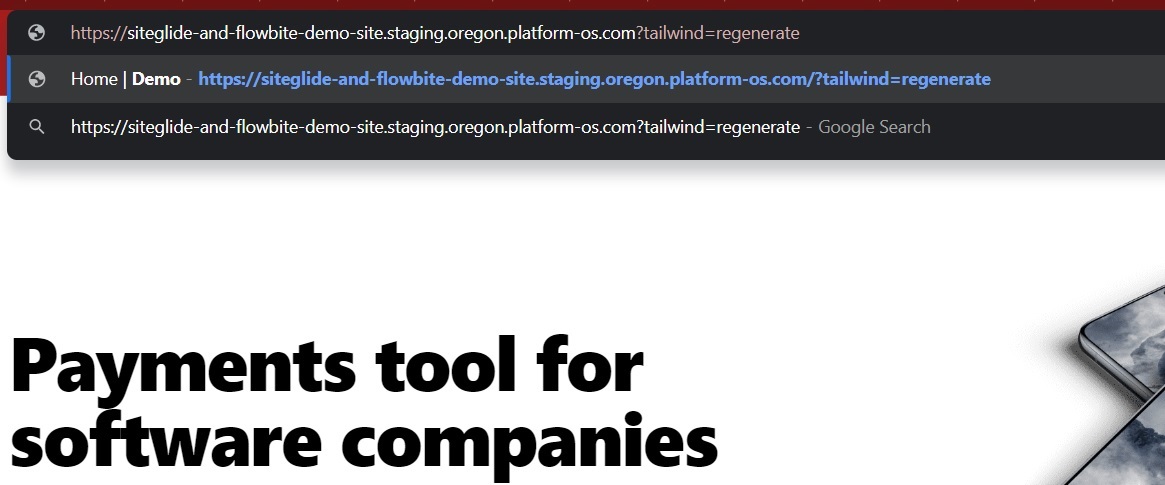
After this, the page will load slowly for the developer once while this is calculated, but then the CSS against the page’s metadata will be updated and everyone else will experience the newly improved page at fast speeds.
Safelisting Classes Which Are Added Via User Interaction
What if my page shows different content depending on user-interaction, or depending on the user’s session? For example a button which either shows “login” or “logout” depending on the situation?
In this case, you may find that the content which changes is missing vital CSS because the Tailwind was only generated for the initial state the components were in.
Since the CDN runs after Liquid has rendered, this includes any classes which sit inside a Liquid if statement, as well as any JavaScript or XHR requests which might add classes to the DOM after initial page load.
One option is to add classes to the safelist in your Tailwind Congfig file: https://v2.tailwindcss.com/docs/optimizing-for-production#safelisting-specific-classes

Another possibility, if you find that your site has a lot of user-interaction and your safelist is getting quite long, might be that your site is better suited to a Using the Tailwind CLI with Siteglide instead!
Alternatively, you may wish to consider using the JIT mode for quick development now for convenience and then switching to a CLI build when the site goes live for reliability.